영상 히스토그램 계산 - 1
import numpy as np, cv2
def calc_histo(image, channels, hsize, ranges ):
    ch = len(channels)
    shape = hsize if ch >1 else (hsize[0], 1)
    hist = np.zeros(shape, np.float32)         # 히스토그램 누적 행렬
    gap = np.divide(ranges[1::2], hsize)                # 계급 간격

    for row in image:  # 2차원 행렬 순회 방식
        for val in row:
            idx = np.divide(val[channels], gap).astype('uint')
            hist[tuple(idx)]+= 1
    return hist
image = cv2.imread("img/pixel.jpg") # 영상 읽기
if image is None: raise Exception("영상 파일 읽기 오류 발생")
ch, hsize, ranges =[0,1],  [8, 8], [0, 256,0, 256]                  # 히스토그램 간격수, 값 범위
hist1 = calc_histo(image, ch ,hsize, ranges)                  # 사용자 정의 히스토그램 계산
hist2 = cv2.calcHist([image], ch, None, hsize, ranges)  # OpenCV 함수

print("사용자 정의 함수: \n", hist1)                           # 행렬을 벡터로 변환하여 출력
print("사용자 정의 함수: \n", hist2)
cv2.imshow("image", image)
cv2.waitKey(0)
사용자 정의 함수:
[[2.0220e+03 4.6920e+03 5.3890e+03 9.1500e+02 6.9000e+01 0.0000e+00
0.0000e+00 0.0000e+00]
[1.2210e+03 2.2990e+03 1.9860e+03 3.3230e+03 5.9920e+03 8.9000e+02
0.0000e+00 0.0000e+00]
[5.2000e+01 3.3280e+03 1.4240e+03 1.0690e+03 1.0250e+03 7.8300e+02
1.0000e+00 0.0000e+00]
[0.0000e+00 4.1500e+02 2.1020e+03 1.6460e+03 9.1700e+02 4.1600e+02
5.0000e+00 0.0000e+00]
[0.0000e+00 0.0000e+00 2.9400e+02 1.1890e+03 2.6190e+03 1.0360e+03
1.2200e+02 0.0000e+00]
[0.0000e+00 0.0000e+00 0.0000e+00 4.6000e+01 8.2400e+02 8.7820e+03
2.0220e+03 4.0000e+00]
[0.0000e+00 0.0000e+00 0.0000e+00 0.0000e+00 4.0000e+00 4.1200e+02
1.0451e+04 5.3200e+02]
[0.0000e+00 0.0000e+00 0.0000e+00 0.0000e+00 0.0000e+00 2.0000e+00
3.0300e+02 1.3770e+03]]
사용자 정의 함수:
[[2.0220e+03 4.6920e+03 5.3890e+03 9.1500e+02 6.9000e+01 0.0000e+00
0.0000e+00 0.0000e+00]
[1.2210e+03 2.2990e+03 1.9860e+03 3.3230e+03 5.9920e+03 8.9000e+02
0.0000e+00 0.0000e+00]
[5.2000e+01 3.3280e+03 1.4240e+03 1.0690e+03 1.0250e+03 7.8300e+02
1.0000e+00 0.0000e+00]
[0.0000e+00 4.1500e+02 2.1020e+03 1.6460e+03 9.1700e+02 4.1600e+02
5.0000e+00 0.0000e+00]
[0.0000e+00 0.0000e+00 2.9400e+02 1.1890e+03 2.6190e+03 1.0360e+03
1.2200e+02 0.0000e+00]
[0.0000e+00 0.0000e+00 0.0000e+00 4.6000e+01 8.2400e+02 8.7820e+03
2.0220e+03 4.0000e+00]
[0.0000e+00 0.0000e+00 0.0000e+00 0.0000e+00 4.0000e+00 4.1200e+02
1.0451e+04 5.3200e+02]
[0.0000e+00 0.0000e+00 0.0000e+00 0.0000e+00 0.0000e+00 2.0000e+00
3.0300e+02 1.3770e+03]]
영상 히스토그램 계산 - 2
import numpy as np, cv2
def calc_histo(image, hsize, ranges=[0, 256]):  # 행렬 원소의 1차원 히스토그램 계산
    hist = np.zeros((hsize, 1), np.float32)  # 히스토그램 누적 행렬
    gap = ranges[1] / hsize  # 계급 간격

    for i in range(image.shape[0]):  # 2차원 행렬 순회 방식
        for j in range(image.shape[1]):
            idx = int(image.item(i,j) / gap)
            hist[idx] += 1
    return hist
image = cv2.imread("img/pixel.jpg", cv2.IMREAD_GRAYSCALE) # 영상 읽기
if image is None: raise Exception("영상 파일 읽기 오류 발생")
hsize, ranges = [32], [0, 256]                  # 히스토그램 간격수, 값 범위
gap = ranges[1]/hsize[0]
ranges_gap  = np.arange(0, ranges[1]+1, gap)
hist1 = calc_histo(image, hsize[0], ranges)  # User 함수
hist2 = cv2.calcHist([image], [0], None, hsize, ranges)  # OpenCV 함수
hist3, bins = np.histogram(image, ranges_gap )
print("User 함수: \n", hist1.flatten()) # 행렬을 벡터로 변환하여 출력
print("OpenCV 함수: \n", hist2.flatten()) # 행렬을 벡터로 변환하여 출력
print("numpy 함수: \n", hist3) # 행렬을 벡터로 변환하여 출력
User 함수:
[ 97. 247. 563. 1001. 1401. 1575. 1724. 1951. 2853. 3939. 3250. 2549.
2467. 2507. 2402. 2418. 2727. 3203. 3410. 3161. 2985. 2590. 3384. 4312.
4764. 3489. 2802. 2238. 1127. 628. 199. 37.]
OpenCV 함수:
[ 97. 247. 563. 1001. 1401. 1575. 1724. 1951. 2853. 3939. 3250. 2549.
2467. 2507. 2402. 2418. 2727. 3203. 3410. 3161. 2985. 2590. 3384. 4312.
4764. 3489. 2802. 2238. 1127. 628. 199. 37.]
numpy 함수:
[ 97 247 563 1001 1401 1575 1724 1951 2853 3939 3250 2549 2467 2507
2402 2418 2727 3203 3410 3161 2985 2590 3384 4312 4764 3489 2802 2238
1127 628 199 37]
[ 97. 247. 563. 1001. 1401. 1575. 1724. 1951. 2853. 3939. 3250. 2549.
2467. 2507. 2402. 2418. 2727. 3203. 3410. 3161. 2985. 2590. 3384. 4312.
4764. 3489. 2802. 2238. 1127. 628. 199. 37.]
OpenCV 함수:
[ 97. 247. 563. 1001. 1401. 1575. 1724. 1951. 2853. 3939. 3250. 2549.
2467. 2507. 2402. 2418. 2727. 3203. 3410. 3161. 2985. 2590. 3384. 4312.
4764. 3489. 2802. 2238. 1127. 628. 199. 37.]
numpy 함수:
[ 97 247 563 1001 1401 1575 1724 1951 2853 3939 3250 2549 2467 2507
2402 2418 2727 3203 3410 3161 2985 2590 3384 4312 4764 3489 2802 2238
1127 628 199 37]
색상 히스토그램 그리기
import numpy as np, cv2
def make_palette(rows):
    # 리스트 생성 방식
    hue = [round(i * 180 / rows) for i in range(rows)]  # hue 값 리스트 계산
    hsv = [[(h, 255, 255)] for h in hue]                # (hue, 255,255) 화소값 계산
    hsv = np.array(hsv, np.uint8)                       # numpy 행렬의 uint8형 변환
    # # 반복문 방식
    # hsv = np.full((rows, 1, 3), (255,255,255), np.uint8)
    # for i in range(0, rows):                                # 행수만큼 반복
    #     hue = round(i / rows * 180 )                        # 색상 계산
    #     hsv[i] = (hue, 255, 255)                            # HSV 컬러 지정

    return cv2.cvtColor(hsv, cv2.COLOR_HSV2BGR)         # HSV 컬러 -> BGR 컬러
def draw_histo_hue(hist, shape=(200, 256,3)):
hsv_palate = make_palette(hist.shape[0]) # 색상 팔레트 생성
hist_img = np.full(shape, 255, np.uint8)
cv2.normalize(hist, hist, 0, shape[0], cv2.NORM_MINMAX) # 정규화
gap = hist_img.shape[1] / hist.shape[0] # 한 계급 크기
for i, h in enumerate(hist):
x, w = int(round(i * gap)), int(round(gap))
color = tuple(map(int, hsv_palate[i][0])) # 정수형 튜플로 변환
cv2.rectangle(hist_img, (x,0,w, int(h) ), color , cv2.FILLED) # 팔레트 색으로 그리기
return cv2.flip(hist_img, 0)image = cv2.imread("img/hue_hist.jpg", cv2.IMREAD_COLOR) # 영상 읽기
if image is None: raise Exception("영상 파일 읽기 오류")
hsv_img = cv2.cvtColor(image, cv2.COLOR_BGR2HSV) # BGR 컬러 -> HSV 컬러
hue_hist = cv2.calcHist( [hsv_img], [0], None, [18], [0,180]) # Hue 채널 히스토그램 계산
hue_hist_img = draw_histo_hue(hue_hist, (200, 360, 3)) # 히스토그램 그래프
cv2.imshow("image", image)
cv2.imshow("hue_hist_img", hue_hist_img)
cv2.waitKey(0)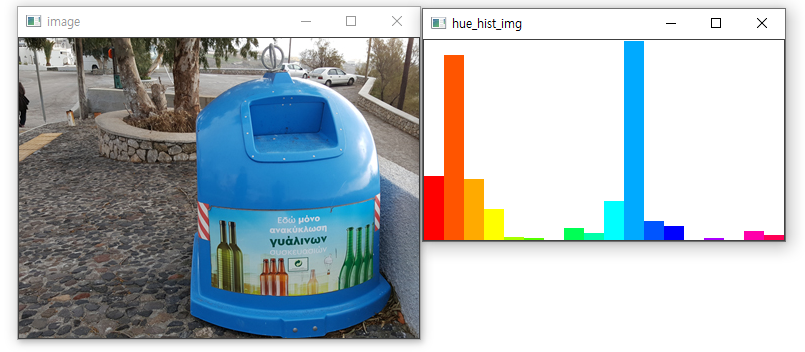
히스토그램 스트래칭
import numpy as np, cv2
def make_palette(rows):
# 리스트 생성 방식
hue = [round(i * 180 / rows) for i in range(rows)] # hue 값 리스트 계산
hsv = [[(h, 255, 255)] for h in hue] # (hue, 255,255) 화소값 계산
hsv = np.array(hsv, np.uint8) # numpy 행렬의 uint8형 변환
# # 반복문 방식
# hsv = np.full((rows, 1, 3), (255,255,255), np.uint8)
# for i in range(0, rows): # 행수만큼 반복
# hue = round(i / rows * 180 ) # 색상 계산
# hsv[i] = (hue, 255, 255) # HSV 컬러 지정
return cv2.cvtColor(hsv, cv2.COLOR_HSV2BGR) # HSV 컬러 -> BGR 컬러def draw_histo_hue(hist, shape=(200, 256,3)):
hsv_palate = make_palette(hist.shape[0]) # 색상 팔레트 생성
hist_img = np.full(shape, 255, np.uint8)
cv2.normalize(hist, hist, 0, shape[0], cv2.NORM_MINMAX) # 정규화
gap = hist_img.shape[1] / hist.shape[0] # 한 계급 크기
for i, h in enumerate(hist):
x, w = int(round(i * gap)), int(round(gap))
color = tuple(map(int, hsv_palate[i][0])) # 정수형 튜플로 변환
cv2.rectangle(hist_img, (x,0,w, int(h) ), color , cv2.FILLED) # 팔레트 색으로 그리기
return cv2.flip(hist_img, 0)def search_value_idx(hist, bias = 0):
for i in range(hist.shape[0]):
idx = np.abs(bias - i) # 검색 위치 (처음 또는 마지막)
if hist[idx] > 0: return idx # 위치 반환
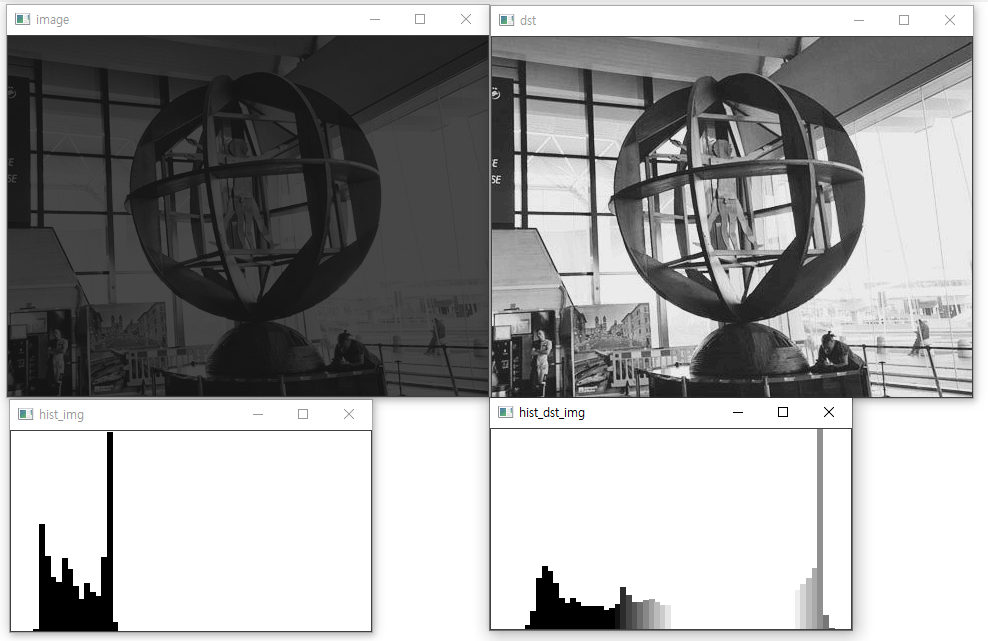
return -1 # 대상 없으면 반환image = cv2.imread("img/dst.jpg", cv2.IMREAD_GRAYSCALE) # 영상읽기
if image is None: raise Exception("영상 파일 읽기 오류")bsize, ranges = [64], [0,256] # 계급 개수 및 화소 범위
hist = cv2.calcHist([image], [0], None, bsize, ranges)
bin_width = ranges[1]/bsize[0] # 계급 너비
high = search_value_idx(hist, bsize[0] - 1) * bin_width
low = search_value_idx(hist, 0) * bin_width
idx = np.arange(0, 256)
idx = (idx - low) * 255/(high-low) # 수식 적용하여 인덱스 생성
idx[0:int(low)] = 0
idx[int(high+1):] = 255dst = cv2.LUT(image, idx.astype('uint8'))
## 룩업 테이블 사용하지 않고 직접 구현
# dst = np.zeros(image.shape, dtype=image.dtype)
# for i in range(dst.shape[0]):
# for j in range(dst.shape[1]):
# dst[i,j] = idx[image[i,j]]hist_dst = cv2.calcHist([dst], [0], None, bsize, ranges) # 결과 영상 히스토그램 재계산
hist_img = draw_histo_hue(hist, (200,360)) # 원본 영상 히스토그램 그리기
hist_dst_img = draw_histo_hue(hist_dst,(200,360)) # 결과 영상 히스토그램 그리기print("high_value = ", high)
print("low_value = " , low)
cv2.imshow("image", image)
cv2.imshow("hist_img", hist_img)
cv2.imshow("dst", dst)
cv2.imshow("hist_dst_img", hist_dst_img)
cv2.waitKey(0)
high_value = 76.0
low_value = 12.0
low_value = 12.0
히스토그램 평활화
import numpy as np, cv2
def make_palette(rows):
# 리스트 생성 방식
hue = [round(i * 180 / rows) for i in range(rows)] # hue 값 리스트 계산
hsv = [[(h, 255, 255)] for h in hue] # (hue, 255,255) 화소값 계산
hsv = np.array(hsv, np.uint8) # numpy 행렬의 uint8형 변환
return cv2.cvtColor(hsv, cv2.COLOR_HSV2BGR) # HSV 컬러 -> BGR 컬러
def draw_histo_hue(hist, shape=(200, 256,3)):
    hsv_palate = make_palette(hist.shape[0])                      # 색상 팔레트 생성
    hist_img = np.full(shape, 255, np.uint8)
    cv2.normalize(hist, hist, 0, shape[0], cv2.NORM_MINMAX)    # 정규화

    gap = hist_img.shape[1] / hist.shape[0]  # 한 계급 크기
    for i, h in enumerate(hist):
        x, w = int(round(i * gap)), int(round(gap))
        color = tuple(map(int, hsv_palate[i][0]))                    # 정수형 튜플로 변환
        cv2.rectangle(hist_img, (x,0,w, int(h) ), color , cv2.FILLED) # 팔레트 색으로 그리기

    return cv2.flip(hist_img, 0)
image = cv2.imread("img/equalize.jpg", cv2.IMREAD_GRAYSCALE) # 영상 읽기
if image is None: raise Exception("영상 파일 읽기 오류")bins, ranges = [256], [0, 256]
hist = cv2.calcHist([image], [0], None, bins, ranges) # 히스토그램 계산# 히스토그램 누적합 계산
accum_hist = np.zeros(hist.shape[:2], np.float32)
accum_hist[0] = hist[0]
for i in range(1, hist.shape[0]):
accum_hist[i] = accum_hist[i - 1] + hist[i]
accum_hist = (accum_hist / sum(hist)) * 255 # 누적합의 정규화
dst1 = [[accum_hist[val] for val in row] for row in image] # 화소값 할당
dst1 = np.array(dst1, np.uint8)
# #numpy 함수 및 룩업 테이블 사용
# accum_hist = np.cumsum(hist) # 누적합 계산
# cv2.normalize(accum_hist, accum_hist, 0, 255, cv2.NORM_MINMAX) # 정규화
# dst1 = cv2.LUT(image, accum_hist.astype("uint8")) #룩업 테이블로 화소값할당dst2 = cv2.equalizeHist(image) # OpenCV 히스토그램 평활화
hist1 = cv2.calcHist([dst1], [0], None, bins, ranges) # 히스토그램 계산
hist2 = cv2.calcHist([dst2], [0], None, bins, ranges) # 히스토그램 계산
hist_img = draw_histo_hue(hist)
hist_img1 = draw_histo_hue(hist1)
hist_img2 = draw_histo_hue(hist2)cv2.imshow("image", image); cv2.imshow("hist_img", hist_img)
cv2.imshow("dst1_User", dst1); cv2.imshow("User_hist", hist_img1)
cv2.imshow("dst2_OpenCV", dst2); cv2.imshow("OpenCV_hist", hist_img2)
cv2.waitKey(0)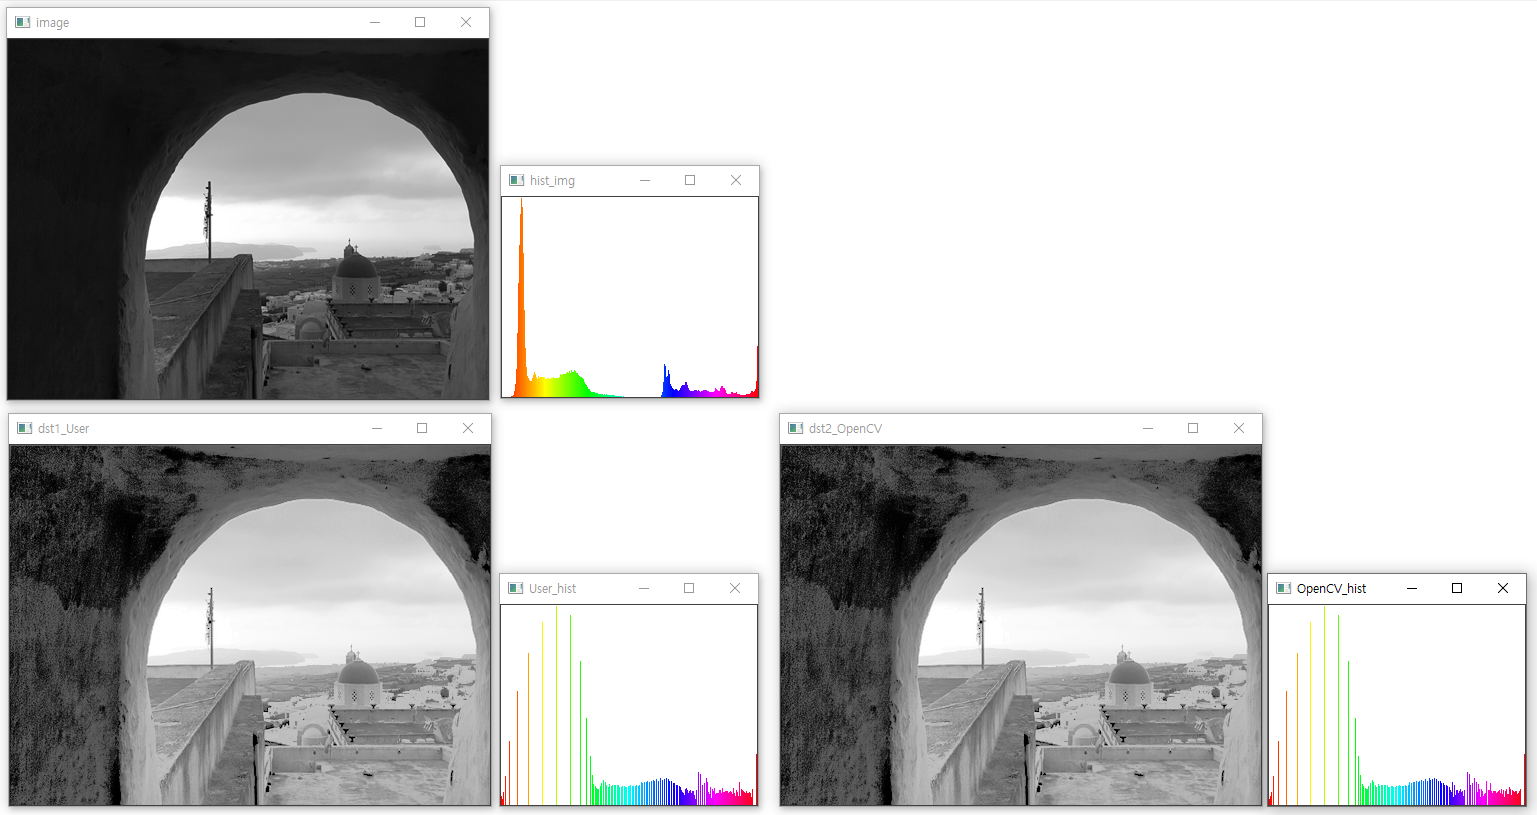
'Image Processing > OpenCV' 카테고리의 다른 글
| [OpenCV] 블러링과 샤프닝 (0) | 2022.11.24 |
|---|---|
| [OpenCV] 03. 화소처리 (컬러 공간 변환) (0) | 2022.11.23 |
| [OpenCV] 01. 화소 처리 (0) | 2022.11.22 |
| [OpenCV] 산출 연산 함수 (0) | 2022.11.21 |
| [OpenCV] 기본 배열 연산 (Operations On Arrays) (0) | 2022.11.19 |


댓글